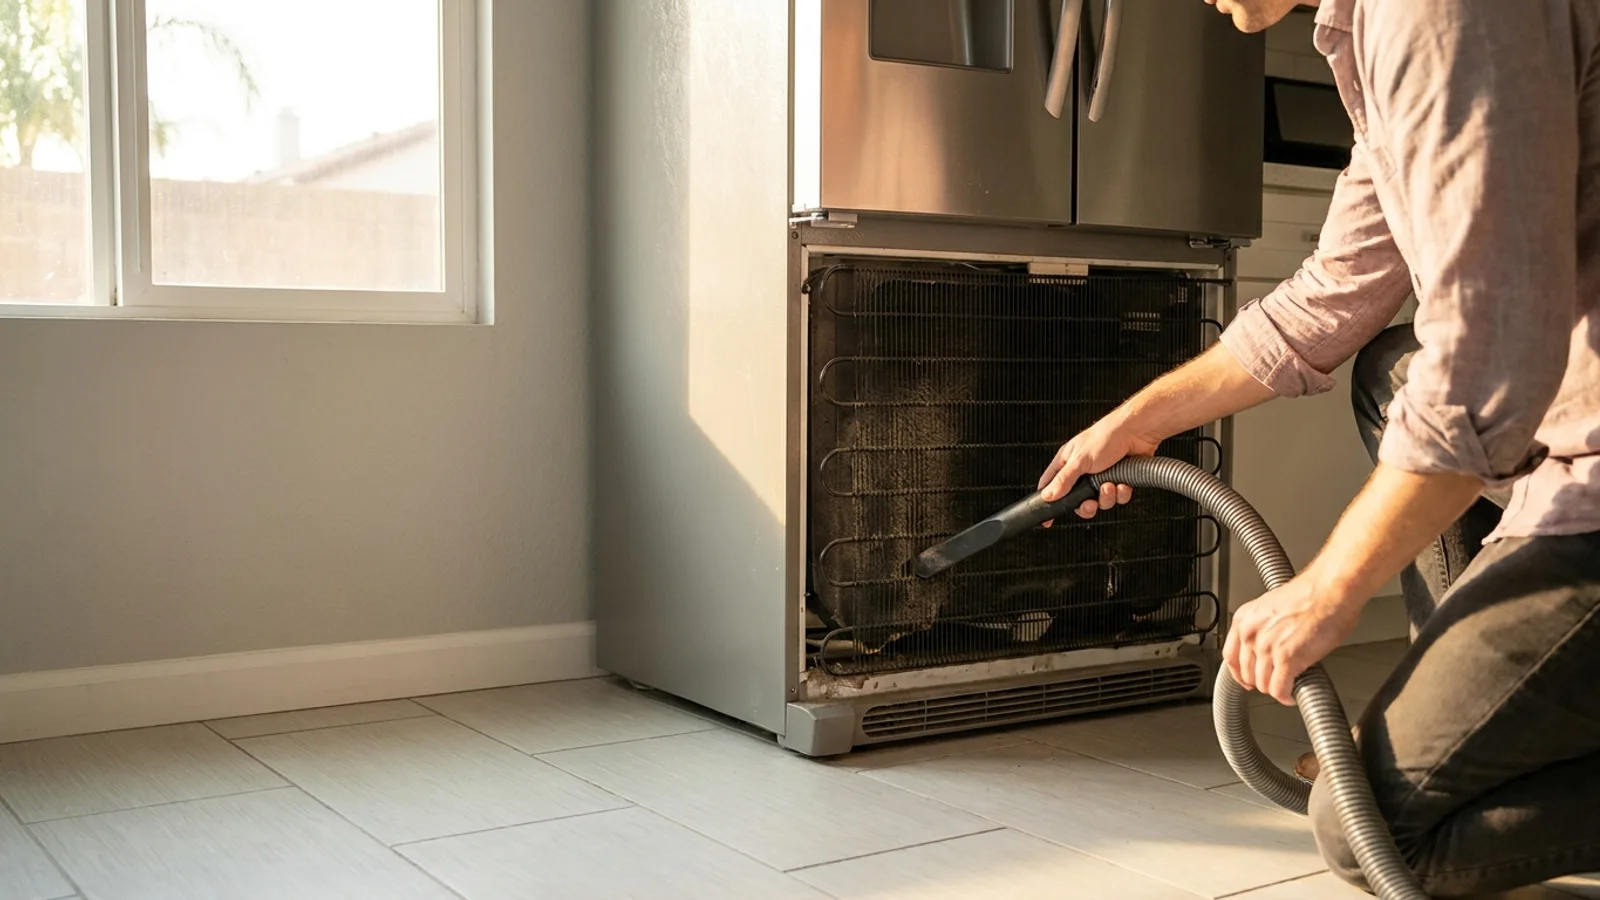
To clean refrigerator coils, unplug the fridge, find the condenser coils behind the bottom grille or on the back, then vacuum and brush off the dust and pet hair packed between them. Slide the fridge out if the coils are on the back, work from top to bottom, and vacuum the floor before you push it back. Clean when the coils look packed, or on the interval the maker lists. Pet hair can pack faster than household dust. Clean coils let the fridge shed heat instead of trapping it in dust. That can help it cool more steadily. It does not measure a bill or a compressor lifespan.
Dust on the coils can make a fridge run warm, short-cycle, or hum louder. Frequency is not ranked here. It’s also the easiest fix on the whole appliance. Here’s exactly how to do it.
Where are the coils on a refrigerator?
The condenser coils are either behind a snap-off grille along the bottom front of the fridge, or mounted flat against the back. Bottom-mount coils are the most common on newer refrigerators, and they clog fastest because they sit right at floor level where dust and hair collect. Back-mount coils are typical on older or smaller units. If you can’t find a front grille, the coils are on the back.
You do not need to reach the evaporator coils inside the freezer. Those sit behind a panel and are managed by the defrost system. The coils that need cleaning are the black, radiator-like grid on the outside that dumps heat out of the fridge.
What you need
You can clean coils with tools most homes already have:
- A vacuum with a hose and a narrow crevice attachment
- A refrigerator coil brush (a long, flexible bristle brush, a few dollars online or at a hardware store)
- A flashlight
- A damp cloth for the surrounding floor and grille
The coil brush matters. A vacuum alone pulls the loose top layer, but the brush is what loosens the packed felt of dust wedged deep between the fins.
How to clean refrigerator coils, step by step
The whole job takes 15 to 20 minutes.
-
Unplug the refrigerator. Pull the plug or switch off the breaker. You’re working near the compressor and a fan, so kill the power first. It’s not optional.
-
Get to the coils. For bottom coils, pull the base grille straight off. Most snap or unclip; a few have two screws. For back coils, ease the fridge away from the wall far enough to reach behind it. Go slow so you don’t kink the water line to the ice maker.
-
Vacuum the loose dust. Run the crevice tool across the face of the coils and along the floor and fan housing. This clears the top layer so you can see what you’re working with.
-
Brush between the fins. Slide the coil brush in and pull it back out, working top to bottom across the whole grid. You’ll drag out gray felt, pet hair, and grit. Vacuum as you go so it doesn’t just resettle.
-
Clean the fan and the floor. Behind bottom coils there’s a condenser fan that also cakes with dust. Wipe its blades gently and vacuum the tray area. Wipe the floor under the fridge before it goes back.
-
Reassemble and restore power. Snap the grille back on or slide the fridge into place, leaving a couple of inches of clearance at the back for airflow. Plug it in. You’ll often hear the fridge run quieter within the hour.
How often should you clean refrigerator coils?
Clean when the coils look packed, or on the interval the maker lists. There is no calendar interval published as a life-extension rule. Follow the maker, or clean when the grille is packed. Homes near the coast get an extra factor: fine airborne grit and the dust that rides San Diego’s dry Santa Ana winds settle low and pack into bottom-mount grilles quickly. If your kitchen tends to run warm in the afternoon sun, clean coils help the fridge keep up when it’s working hardest.
A simple cue: pick a date you’ll remember, like a season change, and pair it with your other kitchen upkeep. Our seasonal appliance maintenance checklist includes coil cleaning as a reminder, not as a published once-or-twice-a-year life-extension rule.
Why dirty coils make your fridge run warm and cost you money
The condenser coils release the heat the fridge pulls out of the food compartment. When dust blankets them, that heat has nowhere to go. The compressor may then run longer and hotter to hit the same temperature. Possible results include weaker cooling, higher energy use, and extra compressor wear. Those are possible outcomes, not measured degrees, dollar savings, or years added. A thick dust layer can make the fridge cycle more often. Cleaning coils is still the cheapest owner step that can restore heat release.
For typical lifespan ranges, see our guide on how long appliances last.
Signs your coils are overdue for a cleaning
Watch for these:
- The fridge runs almost constantly instead of cycling on and off
- Food in the fresh-food section feels warmer than it should
- The compressor or the area behind the fridge feels hot to the touch
- A louder or more frequent hum than you’re used to
- Visible dust or pet hair matted across the bottom grille
If you catch these early, a coil cleaning often fixes them on its own.
When it’s not the coils
Cleaning coils fixes cooling problems caused by poor heat release. It won’t fix a mechanical or sealed-system fault. If your fridge is still warm a day after a thorough coil cleaning, the cause is likely something else: a failed condenser or evaporator fan, a bad start relay, low refrigerant, or a stuck defrost system. Our fridge not cooling checklist walks through those causes in order. A steady buzzing or rattling that cleaning doesn’t quiet usually points at a failing fan motor, covered in our guide to a refrigerator making a buzzing noise.
When it’s a repair rather than routine care, we match you with independent technicians for refrigerator repair across San Diego County. If the fridge is still warm after you’ve cleaned the coils, leave a voicemail at (858) 988-7787 to request a match. The matched technician diagnoses first and quotes in writing before work begins.
While you’re keeping the kitchen in shape, the same routine care applies elsewhere. See our guides on how to clean stainless steel appliances and how to clean a dishwasher, or start at our appliance repair in San Diego page if you need local help.
Frequently asked questions
How often should refrigerator coils be cleaned?
Clean them when they look packed, or on the interval the maker lists. Pet hair can pack faster than household dust. There is no 6-to-12-month or 3-to-4-month rule published here as a life-extension schedule. The job is short, so cleaning packed coils costs almost nothing.
Can I clean refrigerator coils myself?
Yes. Coil cleaning is one of the safest DIY appliance jobs, as long as you unplug the fridge first. You need a vacuum with a hose and a coil brush sold for this job. Pull off the bottom grille or ease the fridge from the wall, vacuum and brush the dust off the coils and fan, then reassemble. There’s no refrigerant or wiring to disturb.
What happens if you never clean your refrigerator coils?
Dust can build into an insulating blanket that traps heat against the coils. The fridge may then run longer and hotter to stay cold. Energy use and compressor wear can rise. They are not measured from this page. In some cases the fridge cannot hold temperature, and food can spoil. Dirty coils are one of the first things a technician may check on a fridge that’s running warm.
Do I need special tools to clean refrigerator coils?
No special tools, just a vacuum with a crevice attachment and a refrigerator coil brush. The brush is worth buying, since it loosens the packed dust a vacuum alone leaves behind. A flashlight helps you see between the fins, and a damp cloth handles the grille and floor.
Will cleaning the coils fix a fridge that isn’t cooling?
Often, if dirty coils are the cause. When dust is blocking heat release, cleaning the coils lets the fridge cool normally again within a day. If it’s still warm after a thorough cleaning, the problem is elsewhere, like a failed fan, a bad relay, or low refrigerant, and that needs a technician. Our fridge not cooling checklist covers how to tell the difference.