There’s nothing more frustrating than pulling clothes out of the dryer only to find them still damp and cool. When your dryer runs through its cycle but produces no heat, a failing heating element is a very common culprit. Before you call for professional help, you can perform a simple diagnostic test with a multimeter to confirm if this part is truly the problem.
This guide will walk you through the steps to safely test your dryer’s heating element. It will also help you understand what a replacement might cost here in San Diego. Knowing the issue beforehand can save you time and help you make an informed decision about repair.

Symptoms of a failed heating element
A dryer heating element is a vital component. It creates the hot air needed to dry your clothes effectively. When it fails, your dryer still spins and tumbles, but the air inside stays cool or only gets mildly warm. Understanding the symptoms can help you accurately pinpoint the problem.
The most obvious sign is that your clothes remain wet or damp after a full drying cycle. You might also notice drying times getting progressively longer, as the dryer tries to compensate for the lack of heat. Sometimes, you may even feel a faint, cool breeze blowing from the dryer vent instead of the usual warm air. If you have an older dryer, you might even open the door and see that the heating element, typically a coiled wire, isn’t glowing red as it normally would during operation.
It’s important to distinguish these symptoms from other issues. A dryer that doesn’t turn on at all, or one that makes unusual noises, points to different problems than just a lack of heat. For example, a clogged vent can cause overheating and shut down the heating element temporarily, but it’s not the element itself that’s failed. Recognizing the specific signs of a bad heating element helps narrow down the diagnostic process. This way, you can approach the fix with confidence.
A 2-minute safety check before you start
Before you even think about touching your dryer’s internal components, safety must be your top priority. Working with appliances that use electricity and sometimes gas can be dangerous if you don’t take proper precautions. This quick safety check ensures you minimize any risks.
First and foremost, unplug your dryer from the wall outlet. This step is non-negotiable for electric dryers. If you have a gas dryer, you’ll need to turn off the gas supply valve in addition to unplugging the unit. The gas shut-off valve is usually located behind the dryer, often a yellow or red handle that turns perpendicular to the gas line when closed. Never assume the power is off; always visually confirm the cord is unplugged.
Next, wear appropriate safety gear. Heavy-duty work gloves can protect your hands from sharp edges inside the appliance. Safety glasses are also a good idea to shield your eyes from any dust or debris. Make sure your workspace is clear and well-lit. You’ll need enough room to pull the dryer away from the wall and access its back panel. Gather all your tools, including your multimeter, screwdrivers, and any nut drivers you might need. Having everything ready before you start prevents frustration and reduces the chance of hurrying. Remember, patience and caution are your best friends when doing any appliance repair.
The multimeter test: what to look for
Now that safety is handled, you’re ready to perform the actual test. This involves using a multimeter, an essential tool for appliance troubleshooting. You’ll be checking for continuity, which tells you if an electrical path exists through the heating element.
First, you’ll need to locate the heating element. This usually involves removing the back panel of your dryer. Use your screwdriver or nut driver to remove the screws holding the panel in place. Carefully set the panel aside. Inside, you’ll see various components. The heating element typically looks like a coiled wire housed in a metal chamber. It will have two electrical terminals where wires connect to it.
Before testing, disconnect the wires from the heating element terminals. Make a note of which wire goes to which terminal, or take a quick photo, to ensure correct reassembly. Set your multimeter to the ohms (Ω) setting, usually represented by the omega symbol. If your multimeter has different ohm ranges, start with a lower one, like 200 ohms, or use the auto-range feature if available. Touch one probe of the multimeter to each terminal of the heating element.
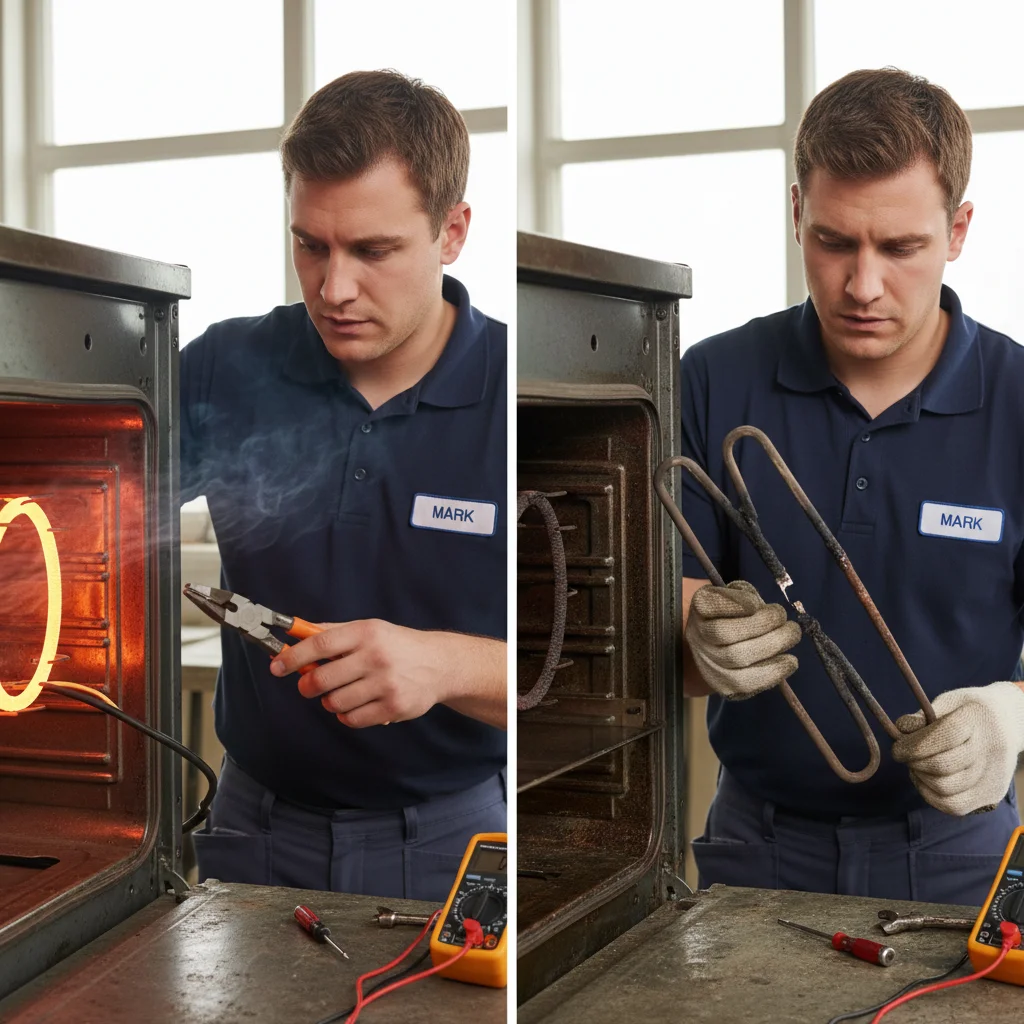
A functional heating element should show a low resistance reading, typically between 0.5 and 15 ohms. The exact number can vary by dryer model, so a range is normal. If your multimeter displays “OL” (Over Limit), “infinity,” or a very high number, it means there is no continuity. This indicates an open circuit, meaning the heating element is broken and needs replacement. If you get a reading within the normal range, your heating element is likely fine, and the problem lies elsewhere.
What a replacement costs in San Diego
If your multimeter test confirms the heating element is indeed faulty, your next question is probably about replacement costs. In San Diego, these costs can vary based on several factors: the brand and model of your dryer, whether you opt for a DIY replacement or professional service, and the specific cost of the part itself.
A new heating element part typically costs between $50 and $200. Some specialized or proprietary elements for high-end dryers might be a bit more. You can usually find these parts online or at appliance parts stores. If you’re comfortable with DIY, you’ll save on labor costs. However, accessing the element and replacing it correctly can be tricky, often requiring specific tools and knowledge to ensure all connections are secure and safe. Incorrect installation can lead to further problems or even safety hazards.
When you hire a professional for appliance repair, you’re paying for their expertise, tools, and the guarantee of a proper, safe installation. For a dryer heating element replacement in San Diego, professional service generally ranges from $150 to $400, including parts and labor. This cost covers the technician’s time for diagnosis, installation, and testing the new part. While it’s a higher upfront cost, it provides peace of mind that the job is done right, often with a warranty on parts and labor. For reliable dryer repair in the San Diego area, getting a professional estimate is always a smart move.
When it’s not the element (other culprits)
You’ve tested the heating element, and it shows a good resistance reading. What now? If your dryer is still running but producing no heat, the heating element isn’t the problem. Several other components can cause this issue, requiring further diagnosis. This is where professional help often becomes invaluable, as these parts can be harder to access and test.
One common culprit is a failed thermal fuse. This safety device blows to prevent overheating if the dryer gets too hot, often due to a clogged vent. A blown thermal fuse means there’s an open circuit, and the dryer won’t heat. Similarly, thermostats (cycling and high-limit) regulate the temperature. If one fails, it might signal the element not to heat or prevent it from getting hot enough. These are usually mounted near the heating element or on the blower housing.
For gas dryers, a malfunctioning igniter or flame sensor can prevent the gas burner from lighting, leading to no heat. Even though the dryer runs, the heat source isn’t active. Less common but still possible issues include a faulty timer or control board. These components manage the dryer’s cycles and functions. If they aren’t sending the correct signals to the heating element or other heat-related parts, your dryer won’t produce warm air.
Diagnosing these other components often requires more specialized knowledge and tools. If your heating element is good, and you’re not comfortable delving deeper into your dryer’s internal workings, it’s time to call a professional. For more general information on dryer repair in San Diego, you can check out our other resources.
Frequently asked questions
How do I test a dryer heating element with a multimeter?
Set the multimeter to the ohms setting, disconnect the wires from the element’s two terminals, and touch one probe to each terminal. A working element reads between 0.5 and 15 ohms. A reading of OL (Over Limit), infinity, or a very high number means there is no continuity and the element is broken and needs replacement.
What does a dryer heating element replacement cost in San Diego?
The part itself costs $50 to $200 depending on the dryer brand and model. Professional installation in San Diego generally runs $150 to $400 total, including parts and labor. High-end or proprietary elements cost more, and labor time varies by how deeply the element is buried in the machine.
What if the heating element tests fine but the dryer still won’t heat?
Check the thermal fuse next. The thermal fuse is a one-time safety device that blows when the dryer overheats, usually from a clogged vent, and cuts the heating circuit. A blown fuse will show the same OL reading as a bad element. Also test the cycling thermostat and high-limit thermostat, both mounted near the element or blower housing, for continuity.
Is it safe to test and replace a dryer heating element yourself?
Unplugging the dryer and confirming the cord is out of the wall before opening the back panel makes the multimeter test safe for most people. The replacement itself is more involved. It requires reassembling all connections correctly and, on gas dryers, working near gas lines. If you’re not fully comfortable with appliance wiring or don’t have the right tools, the repair is better left to a technician.
When to call us
While a multimeter test for the heating element is a great DIY diagnostic step, the actual replacement and further troubleshooting can be complex. Working inside a dryer involves electrical components and, for gas models, gas lines. If you’re not fully comfortable with the repair, or if the heating element isn’t the problem, it’s best to call a professional. We offer fast, reliable dryer repair services throughout San Diego County. Our technicians can quickly diagnose and fix the problem, ensuring your dryer operates safely and efficiently. Always check that your repair company is registered with the California Bureau of Household Goods and Services (BHGS) at bhgs.dca.ca.gov.
Call us at (858) 988-7787 for a same-day estimate.