An oven that runs hot or cold is almost always a failed temperature sensor (oven thermostat) or an oven that needs recalibration. You can test the sensor with a multimeter and recalibrate most ovens in under five minutes.

Why your oven isn’t heating to the right temperature
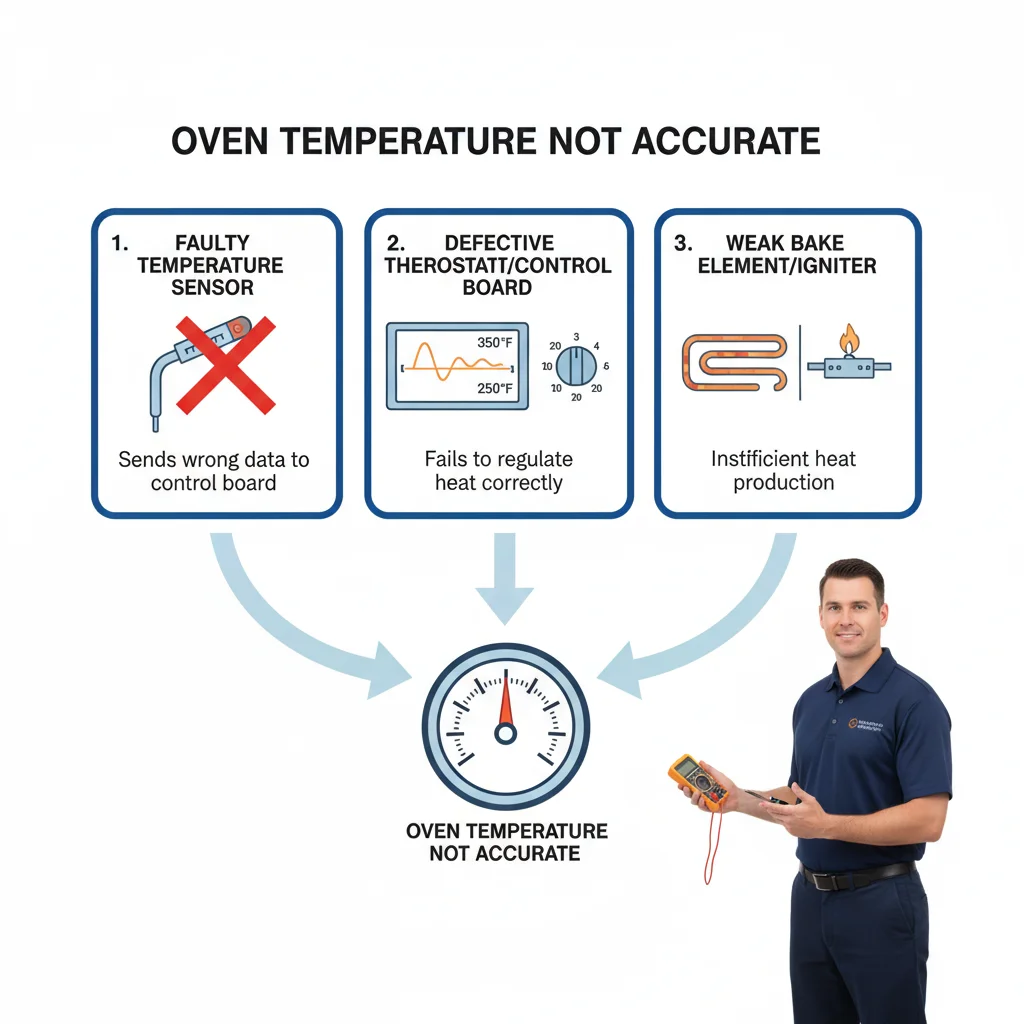
An oven that isn’t heating accurately usually points to a fault in one of its core components responsible for sensing or regulating heat. Your oven’s internal system relies on a delicate balance: a temperature sensor (often a thermistor or probe) constantly monitors the internal heat, while the thermostat interprets this data and signals the heating elements (bake element for electric, igniter/burner for gas) to turn on or off.
When this system breaks down, your oven might consistently run too hot, too cold, or fluctuate wildly. The problem isn’t always that your oven isn’t heating at all, if that’s your issue, we recommend checking out our guide on oven not heating troubleshooting. Instead, it’s about precision. Factors like a dirty oven cavity, an obstructed vent, or even frequently opening the door can temporarily affect readings, but persistent inaccuracy usually signals a component issue. Understanding this basic process is the first step toward diagnosing what’s truly going on with your San Diego kitchen’s most essential appliance.
Step 1: How to test your oven’s temperature with a thermometer
Before you consider calling for professional help, it’s crucial to confirm your oven’s temperature is indeed inaccurate. Appliance displays aren’t always perfect, and a dedicated oven thermometer provides a reliable, independent reading. This simple test costs little and can save you a service call.
What you’ll need
- An oven thermometer. Look for a good quality analog or digital model designed for ovens. Don’t rely on meat thermometers; they aren’t designed for ambient oven temperatures.
- Patience. This test takes time.
The testing process
- Place the thermometer: Position the oven thermometer near the center of your oven’s middle rack. Make sure it’s not touching the sides, back, or any heating elements. You want it to read the ambient air temperature.
- Preheat thoroughly: Set your oven to a common baking temperature, like 350°F (175°C). Let it preheat as usual. Then, wait at least 20-30 minutes after the preheat indicator light or chime goes off. Ovens often overshoot or undershoot slightly during the initial preheat cycle before settling into the set temperature.
- Check the reading: Without opening the oven door fully (use the oven light or quickly peek), check the thermometer’s reading.
- Repeat and record: Check the temperature every 15-20 minutes for at least 1.5 to 2 hours. Note down the actual temperature versus your set temperature. Do this at different set temperatures (e.g., 250°F, 400°F) to see if the inaccuracy is consistent or varies with temperature.
A difference of 15-25°F is generally considered acceptable. Many recipes can tolerate this small variance. However, if your thermometer consistently shows readings 30-50°F (or more) above or below your set temperature, or if it fluctuates wildly, then you definitely have an oven temperature problem. This data is vital for deciding your next steps, whether it’s calibration or calling a technician.
Step 2: Calibrating your oven’s thermostat
If your thermometer test confirms a consistent temperature difference, your oven’s thermostat might need calibration. Many modern ovens, both gas and electric, allow for a slight adjustment to correct temperature discrepancies. This adjustment essentially tells the oven’s computer to offset its internal temperature readings by a certain amount. It’s a convenient feature that can save you from needing a repair.
Locating calibration instructions
Calibration steps vary significantly by oven brand and model. You’ll need to consult your owner’s manual. If you can’t find the physical manual, most manufacturers offer digital versions on their websites by searching for your appliance’s model number. The model number is usually on a sticker or plate located around the oven door frame, behind the bottom drawer, or sometimes on the back.
The calibration process (general guide)
Typically, the process involves entering a special menu through the control panel.
- Access calibration mode: This might require pressing and holding certain buttons (like “Bake” and “Temp Up/Down” simultaneously) or navigating through system settings.
- Adjust the offset: Once in calibration mode, you’ll usually see an option to adjust the temperature up or down in 5-degree increments. Based on your thermometer test results, adjust the offset. If your oven was reading 375°F when set to 350°F, you’d adjust it down by 25°F. If it was reading 325°F, you’d adjust it up by 25°F.
- Save and re-test: Save your changes as instructed by the manual. Then, perform the oven thermometer test again to verify the calibration was successful. You might need to make small, iterative adjustments.
Keep in mind that some older or very basic ovens may not have a digital calibration feature. For those, a physical adjustment might be possible on the thermostat itself, but this is a more complex task best left to a professional to avoid damaging components. Always follow your specific manual’s instructions precisely.
When a bad sensor or igniter is the real problem
While calibration can fix minor discrepancies, significant and inconsistent temperature problems often signal a faulty component. These issues usually require professional diagnosis and replacement. The main culprits are often the temperature sensor, the thermostat, or the heating elements themselves.
Faulty temperature sensor (probe)
Most modern ovens use a resistance temperature detector (RTD) or thermistor, commonly called the temperature sensor or probe. It’s a small rod typically located inside the oven cavity, often protruding from the back wall or ceiling. Its job is to send real-time temperature data to the oven’s control board. If this sensor is defective, it can send incorrect readings, causing the oven to heat too much or too little, or to cycle erratically. A common sign of a bad sensor is an oven that constantly overshoots the set temperature or never reaches it. Sometimes, a visibly damaged sensor or one with a buildup of grime can be the problem.
Defective thermostat
While the temperature sensor gathers data, the thermostat is the brain that acts on it. It regulates power to the heating elements. If the thermostat (or the electronic control board in newer ovens, which integrates thermostat functions) is faulty, it won’t correctly interpret the sensor’s signals or send the proper commands to the heating elements. This can lead to a range of issues, from constant overheating to underheating. Older ovens with mechanical thermostats are more prone to drifting out of calibration over time.
Worn-out bake element or igniter
For electric ovens, a partially failing bake element (the heating coil at the bottom of the oven) can cause temperature inaccuracy. If only part of the element is glowing, or if it takes a very long time to heat up, it’s not producing enough heat, leading to consistently low temperatures. For gas ovens, a weak or faulty igniter is often the culprit. The igniter not only ignites the gas but also acts as a safety sensor to prove flame. If it’s too weak, it might not open the gas valve fully or quickly enough, leading to insufficient heating or long preheat times. A visual inspection can sometimes reveal a failing igniter (it may not glow brightly) or a damaged bake element.
These component failures are more complex to diagnose and replace safely, especially with gas appliances. They often require specialized tools and knowledge of electrical and gas systems.
Professional oven calibration and repair in San Diego
When DIY troubleshooting, like using an oven thermometer and attempting a simple calibration, doesn’t resolve your oven’s temperature issues, it’s time to consider professional help. Many common oven problems, especially those involving electrical components or gas lines, are best left to qualified appliance repair technicians. Attempting to fix complex issues yourself can void warranties, create safety hazards, or lead to more extensive damage.
A professional appliance repair service in San Diego offers several advantages. We have the diagnostic tools to precisely identify the faulty component, whether it’s a subtle sensor malfunction, a failing igniter, or a complex issue with the control board. We also carry common replacement parts, ensuring a quicker repair. Plus, working with gas lines or high-voltage electrical components requires specific expertise and safety precautions that only a trained technician can provide. For example, issues with gas oven igniters can be particularly dangerous if not handled correctly.
At Repair Pro San Diego, we specialize in accurate diagnostics and efficient repairs for all major oven brands and models. Whether your electric oven needs a new bake element or your gas oven requires a thorough igniter check, our experienced technicians are ready to restore your appliance’s precision. For more information on what a service call entails, check out our comprehensive guide on oven repair in San Diego. Don’t let an inaccurate oven ruin another meal; trust the local experts to get your kitchen back in perfect working order. We provide reliable oven & stove repair across San Diego County.
Frequently asked questions
How far off does my oven temperature need to be before something is actually wrong?
A variance of 15 to 25 degrees is generally acceptable and can often be corrected with the oven’s built-in calibration setting. If your oven thermometer consistently reads 30 to 50 degrees above or below the set temperature, or fluctuates wildly between readings, that points to a failing temperature sensor or thermostat rather than a calibration issue.
How do I recalibrate my oven?
The process varies by brand, but most modern ovens let you adjust the temperature offset through a settings menu, usually accessed by pressing and holding buttons like “Bake” and “Temp Up/Down” simultaneously. You adjust the offset in 5-degree increments based on your thermometer readings, then save and retest. Your owner’s manual has the exact steps for your model.
What is a temperature sensor and how do I know if mine is bad?
The temperature sensor is a small metal probe inside the oven cavity, usually protruding from the back wall. It sends real-time temperature data to the control board. A healthy RTD sensor reads close to 1,080 ohms at room temperature. If the reading is way off, the board gets bad data and the oven heats incorrectly, either constantly overshooting the set temperature or never reaching it.
Can a weak bake element or igniter cause temperature problems?
Yes. A partially failing bake element that only heats part of its length produces less heat than the sensor expects, resulting in consistently low temperatures. On a gas oven, a weak igniter may not open the gas valve fully or quickly, which leads to long preheat times and insufficient heat output. A visual inspection of the element or watching the igniter’s glow brightness can reveal both.
When to call us
If your oven continues to bake unevenly, runs too hot or cold despite calibration attempts, or you suspect a faulty component, it’s time to call a qualified appliance repair pro. Dealing with electrical systems or gas lines requires expert knowledge to ensure safety and prevent further damage. Call us at (858) 988-7787 for a same-day estimate.